Hey guys,
have you ever been caught by a smartbomber in low sec and wondered how he was able to kill you? Or have you maybe thought about trying smartbombing pods yourself, but do not yet know how it works exactly?
This article will provide you with the basic know-how needed to become a smartbomber yourself, but will also help you to understand how you can evade smartbombers when traveling through low sec.
Benefits
Before we go into the details, lets look at why players are becoming smartbombers in low sec:
- Kills: First of all you can get a lot of kills this way. If you position yourself at the right gate you can easily get many, many kills including lots of shiny pods, expensive shuttles (e.g. Leopard).
- Solo activity: Its an activity you can do solo. So its something you can do when no one of your buddies are online and you want to get some kills.
- Fun: Its actually a lot of fun to blow up pods, shuttles and rookie ships of totally unsuspecting players. Some guys might even try to go through your gate multiple times, because they don’t understand what is happening.
Drawbacks
But of course they are also some drawbacks to consider before starting a smartbomber career:
- Security status: First of all you will loose a lot of security status. Killing a (neutral) pod causes a big negative hit, so you may not want to do it if you are not already a full pirate or planing to become one. (of course you can choose to only kill war targets and pirates, but then you have much less targets to kill)
- Limited offensive effectiveness: Smartbombs are ineffective against most ships, so a smartbomber needs to be smart about when and what to attack.
- Revenge hunters: Everyone will want to kill you. Especially if you are successful and got a shiny pod. That very guy might come back later to your gate for revenge and might also bring some friends. So its advisable to change gates from time to time. Its also a good idea to use a cloaky alt for some extra intel.
- Repetitive activity: Smartbombing is repetitive and might get a bit dull after some time. So many people just do it occasionally. Or you can try to become a pro smartbomber and start using one of the advanced tactics (see section “Advanced Tactics” below)
Mechanics
In order to be effective as a smartbomber it is important to understand the basic mechanics.
- AoE Damage: Smartbombs deal area of effect (AoE) damage, which means they apply full damage to any object within range. e.g large t1 smartbombs deal damage within a bubble of 5.000 meters radius. That damage will be dealt to any object – friend, foe or neutral – so its wise to check who is in your killlzone carefully before firing.
- No locking: Locking a target is not required, so damage can always be applied immediately. This also means that the usual sensor re-calibration delay after de-cloaking does not apply.
- Distance to stations and gates: Smartbombs can not be activated within 5.000 meters of a gate or station.
- Uses cap: As an energy weapon it needs capacitor to fire.
Kill-able targets
Smartbombers use highly specialized ships, so you are only able to kill a very limited group of ships and nothing else. However, in contrast to many other PVP activites in Eve Online, you will be able to kill your targets every time and with ease.
A popular ship for smartbombing and a good starter ship for this profession is the Maller. With this ship you are able to kill:
- Capsules
- Shuttles (except the Council Diplomatic Shuttle, but including the Leopard)
- Rookie Ships (untanked)
- Venture (untanked, low SP character)
Experienced smartbombers also use T1 battleships (e.g. Rokh), T3 cruisers (e.g. Proteus) and even blackops battleships (e.g. Sin) which allows you to kill bigger ships or use advanced tactics. But for now we will focus on the smartbombing Maller.
Ship Fitting
After a lot of EFT theory-crafting, damage calculations and testing I settled with the following fitting for my smartbombing Maller. This fit has proven to be highly effective in killing the above mentioned ship types and also has several defensive capabilities which will increase your survive-ability.
Fitting for Smartbombing Maller:
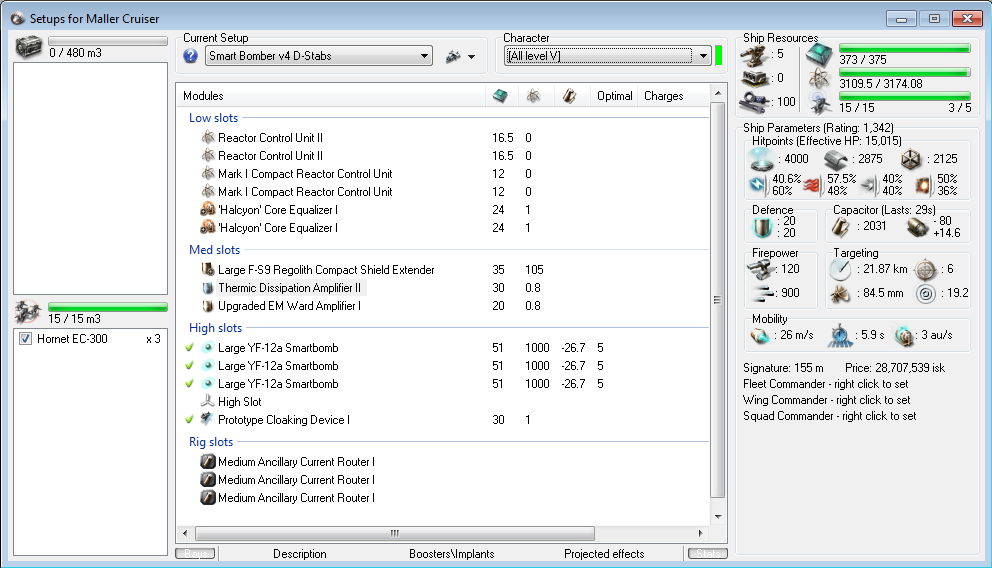
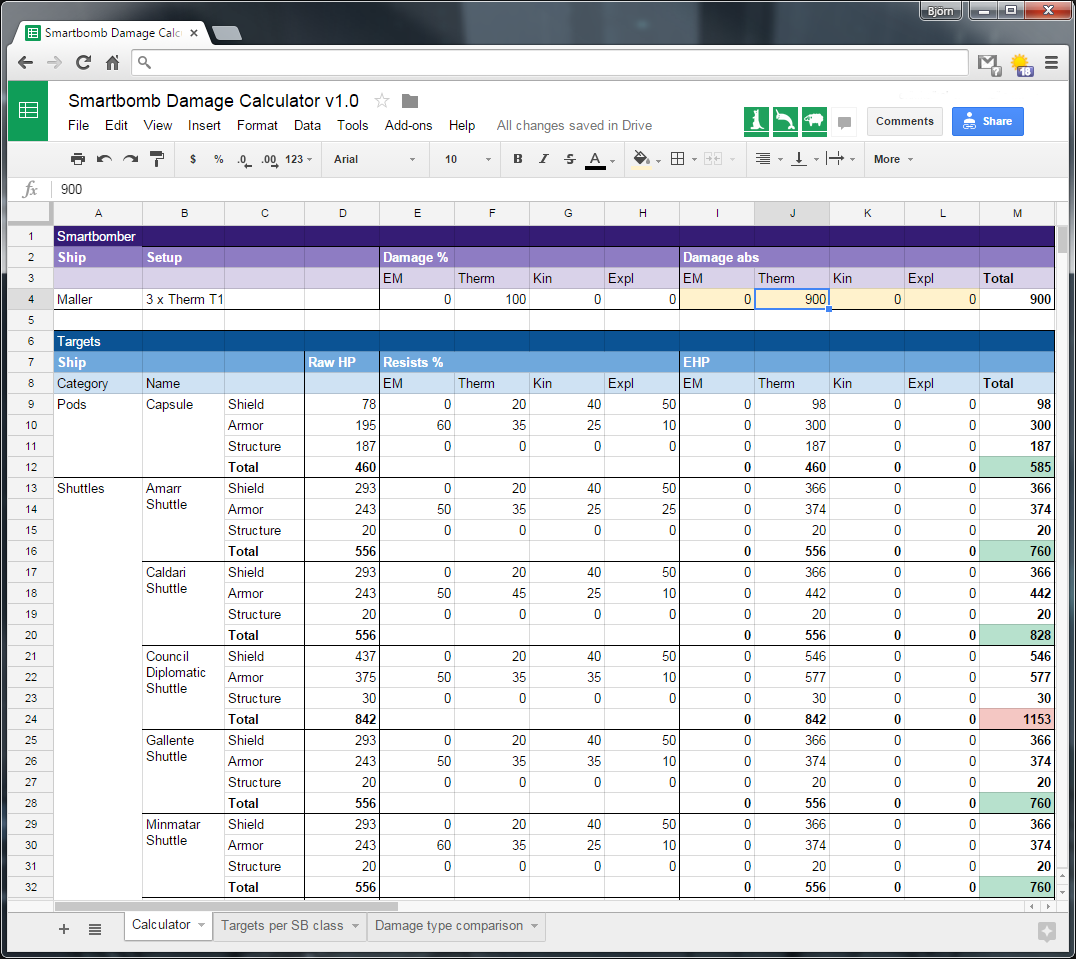
- Smartbombs: 3 x large T1 thermal smartbombs (Large YF-12a) give you 900 alpha damage, which allows you to kill pods, shuttles and rookie ships with one volley. Based on my damage calculations 900 thermal is the most effective damage choice against these ship types. (see link to damage overview sheet in Appendix)
- Cloak: You need a cloak for two reasons:
1) You don’t want your potential victim to spot you before it is too late. If he or she sees a Maller on d-scan he might decide to make a u-turn or warp to another gate.
2) The cloak hides you from random ships and fleets that land on your gate and otherwise might try to engage you. - Tank: You need to be able to tank gate guns for a while.
- Warp Core Stabs: Together with the cloak this is your main protection against other players. Since your offensive weapon is only effective against small targets your best strategy is to run in case you get de-cloaked. Two stabs will protect you against most single attackers.
- Combat drones: Sometimes an (empty) wreck of your victim may be within 2 km of your spot, preventing you from cloaking. In that case you can use your combat drones (e.g. Hobgoblins) to destroy it.
(See the Appendix at the bottum of this article for the Maller fitting in EFT format.)
Basic tactics
The basic tactic is the stationary cloaky smartbomber. Your targets are pods, shuttles and rookie ships that are warping from “in-gate” to “out-gate” in your system (the “in-gate” is the gate which the targets uses to enter the system, the “out-gate” is the gate which the targets uses to exist the system). You sit cloaked at the out-gate and watch d-scan to see if a kill-able target arrives.
When you see a kill-able target arriving:
- When it lands on your gate and is within your kill-zone (< 5km away), you uncloak and – after a brief pause – activate your smartbombs which will instantly kill your target.
- If the target was a shuttle or a rookie ship you let your smartbombs cycle once to also kill the pod.
- Then you warp off to your gate perch to get rid of the gate guns (if the target was a neutral)
- Warp back to your gate and get again into position for the next target.
- Pick up the corpse and destroy the wreck if they are too close and might decloak you
When you see a non kill-able target arriving:
- Don’t decloak, but stay put and wait for the ship to land and jump the gate.
- Sometimes the ship warps in too close (< 2.000m) and de-cloak you. If that happen’s watch closely what the ship does and warp-off to a save if you see any suspicious action (e.g. if he is not jumping right away)
- Warp back to your gate and get into position for the next target after the threat is gone.
In order to be able to effectively kill your targets you need to get two things right: positioning and timing.
- Positioning: You want your targets to always land within your killzone, but you also need to keep a distance of at least 5 km to the gate. The right spot for a smartbomber is located a little over 5 km away from the out-gate and in direction to the in-gate. To reach this point, first fully approach the out-gate (e.g. warp to 0). Then align to the in-gate and burn in that direction until you are a little over 5 km away from the out-gate. (I usually try to be between 5.001 and 5.099m away). Its a good idea to bookmark this spot, so you can get in position faster after bouncing due to gate guns or threats.
- Timing: For the right timing you do not want to activate your smartbombs too early or too late. If you activate it too early the target is still invulnerable from the warp. If you activate it too late the target will already started the jump process and again be invulnerable. It usually takes a bit of practice to get the timing right, so be prepared to miss the first targets until you get the hang of it.
What worked for me is: When the target appears on grid I de-cloak, then wait a brief moment, aprrox. 1/2 sec, and then activate all smartbombs at once with my F-Keys.
Please note that you will not be able to kill targets coming jumping into your system through your out-gate. The reason is that they will land at a range of 12 km or more from the gate, which is always outside your kill-zone (5 + 5 km from gate).
Staying safe
Your cloak, your stabs and your ECM drones will help you to stay safe most of the time. As always in low sec you want to watch local and d-scan closely to see if any threats arrive. Here are some additional tips that will help you to stay save:
- Stay cloaked: You cloak is your main protection. A maller and especially a smartbomber is considered an interesting target by many PVPers, so you want to stay cloaked most of the times.
- Eyes on the other side: It is very helpful to have a cloaky alt in the next system (on the other side of your out-gate) to spot threats in time. For example if a bigger fleet lands on the other sideit is often best to warp off, cloak up and wait until the fleet has left the system. Or if one of your previous victims (the one with the shiny) comes back in a PVP ships it might be also a good idea to bail.
- Switch systems: As already mentioned you don’t want to stay too long in the same spot, especially if you are very successful. Its inevitable that someone will form a hunting party to catch you at some point, so its a good strategy to change systems after a while.
- Ships jumping to you: Its is important to know that ships jumping through from the other side of your out-gate will not be able to accidentally de-cloak you. They will always land at a range of at least 12 km from the gate, which is way outside your cloaking bubble (2 + 5 km from gate). However, be prepared to warp off if the landing ship is starting to approach you or shows any other suspicious behaviors.
Choosing a system
To get as many kills as possible you want to pick your system and gate carefully. Here are the most important criteria to consider:
- Traffic: Pick a system with decent traffic. You can use the ingame map or dotlan to figure out which systems have a lot of traffic. However more pilots of course also means more potential threats, so you might not want to pick the most busiest system in New Eden.
- Time of day: You will obviously get the most traffic during peak times (19:00 Eve, +/- 4 hours, weekend according to eve-offline.net).
- Gates: Your ideal system only has 2 gates, so that all traffic has to go through you and will land in your killzone. If the system has more gates, than try to pick the route with the highest traffic. Although neither the ingame map nor dotlan show a break-down of traffic for each gate, you can roughly estimate it by comparing the traffic of the surrounding systems.
You also want to have enough distance between the in-gate and your out-gate to be able to react to incoming traffic. - High-Sec gates: High sec gate preferred by smartbombers, since pilots that have just lost their ship in a low sec fight are often passing though in their pods for re-shipping. However these gates are also more risky, since you most probably can’t jump into high sec to escape an attack. (due to criminal timer for killing pods)
- Stations: Stations are a potential threat, so you ideally want a system without any stations. Alternatively you want to have some distance to the next stations to be able to react to any threat.
Advanced tactics
Now that we have covered the basic mechanics and tactics of smartbombing we are ready to look at some of the more advanced tactics. These will usually require are much higher ISK investment, involve more risk and a lot of skills and experience to get right, so they are usually only pursued by experienced smartbombers.
- Smartbombing battleships: Battleships have a lot more powergrid than the Maller, which allows them to fit more smartbombs and have much higher alpha damage. This allow them to also kill some untanked frigates, like T1 probers and Covert Ops frigates. A popular ship is the Rokh which has 2.100 alpha with large T1 smartbombs (7 x Large T1 SB, 1 x Cloak). This can be further increased with faction smartbombs to a maximum of 2.625 alpha. The most dedicated smarbombers use T2 battleships for smarbombing.
- Hunting pods: Instead of waiting on the out-gate until a target lands in your kill-zone, some smartbombers are hunting pods. They use specially fitted T3 cruisers with high-grade ascendancy implants (T3 Hunter), which allows them to overtake a pod or shuttle in warp and be in position to kill the target when it lands at a gate, celestial or station.
- Preying near big fights: Big fights usually also produce a high number of pods which means a lot of potential victims for a smartbombers. Here again a T3 Hunter (see above) is ideal. But you can also use a smartbombing maller if position yourself right. One good position for smartbombers is the out-gate of the neighboring system of the fight, if is lies on a known travel route, e.g. between the fight and the home system of the loosing party or high sec.
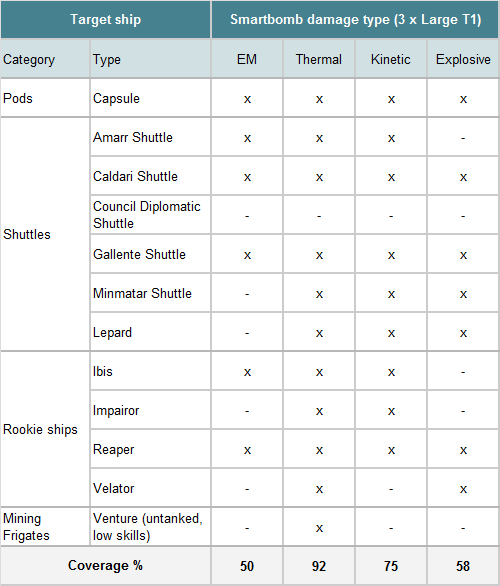
The following table gives you an overview about what ship types can be killed with different smarbomber clases :

Calculated with 100% thermal damage against EHP of each target ship type using the Smartbomb Damage Calulator. (see also section “Choosing the right smartbombs for your ship” for details)
Choosing the right smartbombs
The optimal configuration of smartbombs for your ship depends on many factors, like the size of your ship, the kind of tactics you plan to use, how much ISK you are willing to invest, etc. I find using 3 x T1 Large therm SBs the best choice for the stationary cloaky smartbombing Maller, because it allows you to also kill shuttles and rookie ships (See also Appendix – Damage type comparison). But you may for example choose to focus on pods only, which would allow you to downgrade your smartbombs and get more fitting room for tank, prop mod etc.
In order to quickly see what ship types are killable with any combination of smartbombs I have created a simple tool called the Smartbomb Damage Calculator with Google Sheets. Feel free to make a copy and use it for your own fitting purposes.
Survival strategies
Based on the knowledge how smartbombers operate, we can derive a few strategies on how to avoid them. Note that the first two works best against basic smartbombing tactics (e.g. a stationary smartbombing Maller), but not always against advanced tactics (e.g. Smartbombing battleships or T3 Hunters).
- Never warp gate-to-gate: Never warp directly from in-gate to out-gate (especially if you are only in a pod or shuttle). Instead warp to a perch on the out-gate (if you have one) or bounce at a celestial (e.g. sun, random planet) that is not in alignment between in-gate and out-gate. You will then land outside the kill-zone of the smartbomber and can jump safely.
- Don’t use a normal shutte: As we have seen, normal shuttles (including the Leopard) can be easily killed by a cheap smartbombing maller. The newly introduced Council Diplomatic shuttle however has a lot more tank and can only be killed by a smartbombing battleships, which are rarer used due to they higher costs. So using a diplomatic shuttle is safer, than flying a normal shuttle.
- Tank your prober/mining frigate: Untanked T1 probers, T1 miner and covert ops frigs can be killed by smartbombers, so its highly advisable to tank them above 2.625 EHP (and plug any resist holes, e.g. EM for the Buzzard). You loose some slots, but your nice covert ops frig with the sister probe scanner lives much longer.
Closing
If you have any questions or comments to this article please let me know in the comment section.
Best regards,
Erik
Appendix
Fittings
Here is the fitting for the smartbombing Maller in EFT format:
[Maller, Smart Bomber v4 D-Stabs]
Reactor Control Unit II
Reactor Control Unit II
Mark I Compact Reactor Control Unit
Mark I Compact Reactor Control Unit
‘Halcyon’ Core Equalizer I
‘Halcyon’ Core Equalizer I
Large F-S9 Regolith Compact Shield Extender
Thermic Dissipation Amplifier II
Upgraded EM Ward Amplifier I
Large YF-12a Smartbomb
Large YF-12a Smartbomb
Large YF-12a Smartbomb
[empty high slot]
Prototype Cloaking Device I
Medium Ancillary Current Router I
Medium Ancillary Current Router I
Medium Ancillary Current Router I
Hobgoblin I x3
Damage type comparison
As you can see from the following chart, using thermal damage for your smartbombs on your Maller is the most effective choice. The reason is that shuttles and rookie ships have different resistance profiles, and the resistances against thermal damage happens to be the lowest among these ships. This means that any other damage type will reduce the amount of ship types you can kill with your smartbombing Maller.
Lose*
Get it right.
Nice article, i did do this a couple of times, and i actually been successful once however never again. This is certainly rough
like a fucker
Thank you for penning to ensure that stupid crackheads
like myself may comprehend it!